4. Cloud Installation
4.1. Overview
The cloudadmin (usually multiple people) control the AWS-side of the infrastructure. It is beyond the scope of this document to describe in detail the web-portal console provided by Amazon. Screenshots will simply presume you know how to access your AWS account and are comfortable with copying time-limited access keys to a local credentials file for command-line access.
Cloudadmins must be comfortable at the Linux command line prompt. All RCS3 configuration and implementation is performed with command-line tools from within a local Linux environment. Access to the AWS console enables admins to look at various dashboards.
Major Steps of Installation
Ready a local system or use our Docker Image for all software prerequisites.
Clone the rcs3 repository and keep it in a non-volatile location.
Make some one-time configuration decisions and make those configuration decisions available to sysadmins.
Build out some basic infrastructure components in AWS.
4.2. Ready a local system
We maintain a docker image rcs3uci/rcs3-rocky8 on DockerHub that
can be used on both backup servers and for the cloudadmin. For the cloudadmin, this same image can be used under
Singularity.
The admin configuration needs to be held outside of the docker image. For brevity, we use the environment variable RCS3_ROOT (persistent store). This directory holds the cloned rcs3 git repository, localized configuration, and ephemeral AWS credentials. This directory should be bind-mounted so that it is reachable from within the image. The image default is RCS3_ROOT=/.rcs3.
To start the Docker image using Singularity and persistently storing data in the existing directory /my/rcs3, use:
export SINGULARITYENV_PS1='RCS3 Singularity @\h \w> '
export SINGULARITY_BIND=/my/rcs3:/.rcs3
singularity shell docker://rcs3uci/rcs3-rocky8
RCS3 Singularity />   # you should see this Singularity prompt
The PS1 line sets a slightly more meaningful prompt by adding the hostname (@\h) and the working directory (\w) while reminding the cloudadmins that they are inside of the container.
Optionally, run under Docker instead of Singularity (replace the singularity command above with the docker command):
docker run -it --volume /my/rcs3:/.rcs3 rcs3uci/rcs3-rocky8 /bin/bash
RCS3 Docker />   # you should see this Docker prompt
Note
Examples in this guide will assume that you are using our Docker image running under either Singularity or Docker and that you have mapped a persistent storage area into /.rcs3.
4.3. Clone the rcs3 repository
The rcs3 repository is how software is currently being distributed. To clone the repo:
cd $RCS3_ROOT
git clone https://github.com/RCIC-UCI-Public/rcs3
The following table briefly describes the repo directory structure under rcs3/POC:
Directory |
Description |
|---|---|
cloudadmin |
Python and Bash Scripts to configure the AWS environment, define backup buckets, set quotas, upload dashboards |
common |
Shared code between sysadmin and cloudadmin. |
config |
Location of localized configuration including quotas, jobs.yaml, aws-settings.yaml. |
outputs |
Temporary output files. Used by some scripts. |
scripts |
Python scripts |
sysadmin |
Python scripts utilized sysadmins to localize and run the backup |
templates |
Various “generic” template files (often JSON) that are localized by configuration scripts. These include backup job templates, lifecycle rules, templates for dashboards, policy templates and more. |
4.4. One time Configuration
Attention
Before any preparation of your AWS environment can be made, the cloudadmin MUST change various settings in config/aws-settings.yaml to reflect the local institution.
A template settings file is in the templates/aws-settings.yaml and is the working configuration file that UCI uses.
Warning
A number of one-time decisions made by the cloudadmin in terms of naming (e.g., institution name, bucket postfix, and others) CANNOT be changed later. A large number of AWS services and names rely on static strings. For example you cannot change the name of a bucket once created.
4.4.1. Set your Institution Name
Replace uci with your Institution Name in the AWS settings file. AWS S3 requires all bucket names to have globally unique names. Our approach is to suffix every bucket with as string that begins with uci-p (UCI Production).
If you are deploying for an entire institution, e.g., UCSB then you can simply substitute all occurrences of uci with ucsb. If you are a department, for example, Electrical and Computer Engineering (ECE) then you could substitute uci with ucsb-ece. Use an appropriate substitution for your circumstances.
The following code snippet is an example of using the venerable sed command to replace uci with ucsb-ece placing the results in the config directory:
cd $RCS3_ROOT/rcs3/POC
sed 's/uci/ucsb-ece/g' templates/aws-settings.yaml > config/aws-settings.yaml
This step will get you down the road quite a ways for your local customization. We will assume that you have completed the above step substituting your institutional name appropriately
The next subsections call out the specific areas of the aws-settings.yaml file that you need to address.
4.4.2. Get your AWS Credentials
Login into your AWS Console for Credentials It is beyond the scope of this guide to explain how to access your AWS web-based console. You should be able to see a screen image similar to:

Option to access the web console or command-line access. Click on Command Line Access and then paste the contents of option 2 into the credentials files $RCS3_ROOT/.aws/credentials:

Your $RCS3_ROOT/.aws/credentials file should look similar to the following (keys and tokens below are invalid):
[314159307276_AWSAdministratorAccess]
aws_access_key_id=ASIAX3D737VGKZWY2CBF
aws_secret_access_key=1N4EX4BTU-R2&Z3Aa1o2enaNuzPtd5xrjpf/eoSf3
aws_session_token=IQoJb3JpZ2luX2VjEIP//////////wEaCXVzLXdlc3QtMiJIMEYCIQCG/lvaXGYZuzSZcYooOlmeOfXe9saVApHJKy+ ...
4.4.3. Update your AWS Identifying Accounts
You must replace your AWS account and region, the original looks similar to:
#@@@@ The following MUST be localized to the AWS Account @@@@
profile: "314159307276_AWSAdministratorAccess"
accountid: "314159307276"
region: "us-west-2"
You can find valid regions using the AWS command line itself by first setting a few environment variables: AWS_SHARED_CREDENTIALS_FILE (set up by default in the Docker/Singularity Container) and AWS_PROFILE. For the AWS_PROFILE, you need to use the string between the first […string…] brackets pair of the credentials file. The full sequence using the account above is:
export AWS_PROFILE=314159307276_AWSAdministratorAccess
export AWS_SHARED_CREDENTIALS_FILE=$RCS3_ROOT/.aws/credentials
aws account list-regions
This will output a JSON-formatted string that lists all available regions for your account. Select the appropriate region for your circumstances.
Note
The tokens are time-limited (often valid for 60 minutes). It’s good practice to get fresh tokens and paste them into $RCS3_ROOT/.aws/credentials file before you begin any administrative actions.
4.4.4. Update the admin team notifications
RCS3 uses AWS SNS (Simple Notification Service) to send email alerts. The admin team name should reflect something meaningful to you. Replace rcic-team-notify with something that reflects your organization:
# 4. Notification for the cloud admin team (region, account, sns-team name)
admin_notify: "rcic-team-notify"
4.4.5. Update trusted IP addresses
There are numerous locks and safeguards that can be put in place to limit access to backup buckets. The default is that only a per-server service account and the admins can access a server’s backup bucket. We’ve added IP address ranging as another obstacle to access. For UCI, we allow access from on-campus address ranges. These are specific to UCI and should be changed to reflect your institution:
# 6. Restrict service accounts to specific array of IP addresses using
# condition statements in policy definitions. Expected format is d.d.d.d/d
iprestrictions:
   - "128.200.0.0/16"
   - "128.195.0.0/16"
   - "192.5.19.0/24"
4.4.6. Make your aws-settings.yaml file available
You must make your aws-settings.yaml file available to the systems that you want to backup.
There are no secrets in the aws-settings.yaml file. However, it contains some basic configuration that every client system must know. How you make it available is up to you. Source code repositories, private cloud storage, even an email-attachment could work.
4.4.7. Initialize the Cloud Backup Environment
Once you have settled on the precise configuration of aws-settings.yaml file and made it available to your community, the next step is to initialize the cloud backup environment. These are one-time actions that put essential components in place.
Note
These steps assume current credentials
Step 1: Create the default Storage Lens Configuration
Many of the custom dashboards require Amazon Storage Lens to be configured to make various metrics available:
cd $RCS3_ROOT/rcs3/POC
cloudadmin/create-storage-lens.sh
Step 2: Create emails for administrative notifications
Determine the email addresses of your administrators who should receive notifications for various events and alarms. You can re-run this at any time. Each invocation adds the emails to the full set of emails for the topic. Duplicates are ignored:
cd $RCS3_ROOT/rcs3/POC
cloudadmin/create-admin-sns-topic.py -e <email1> [<email> ...]
Note
There is no simple command-line method provided by AWS to delete an email. It is straightforward to do this interactively in the online AWS web console. Open the Simple Notification Service, go to your admin topic and delete an email from there.
Step 3: Enable Monitoring
RCS3 creates a custom Cloudwatch monitoring dashboard to give an overview of resource usage. There is also a custom set of metrics created to the track password age of each server’s service account. This is implemented by an AWS lambda function with limited permissions. The lambda is then run hourly in AWS using the Event Bridge Scheduler. The scheduler is given permission to invoke the particular lambda. The lambda, in turn, is given the permission to read the ages of passwords and publish the metric for Cloudwatch dashboards and alarms. For those familiar with UNIX, this is a convoluted way of saying: “The key age metrics are generated using a cron job.”
The various roles, permission sets, trust relationships, and dashboard are all set up in a convenience script:
cd $RCS3_ROOT/rcs3/POC
cloudadmin/enable-monitoring.sh
Once you have run this shell script AND you have on-boarded servers for backup, you will eventually see a display similar to the following:
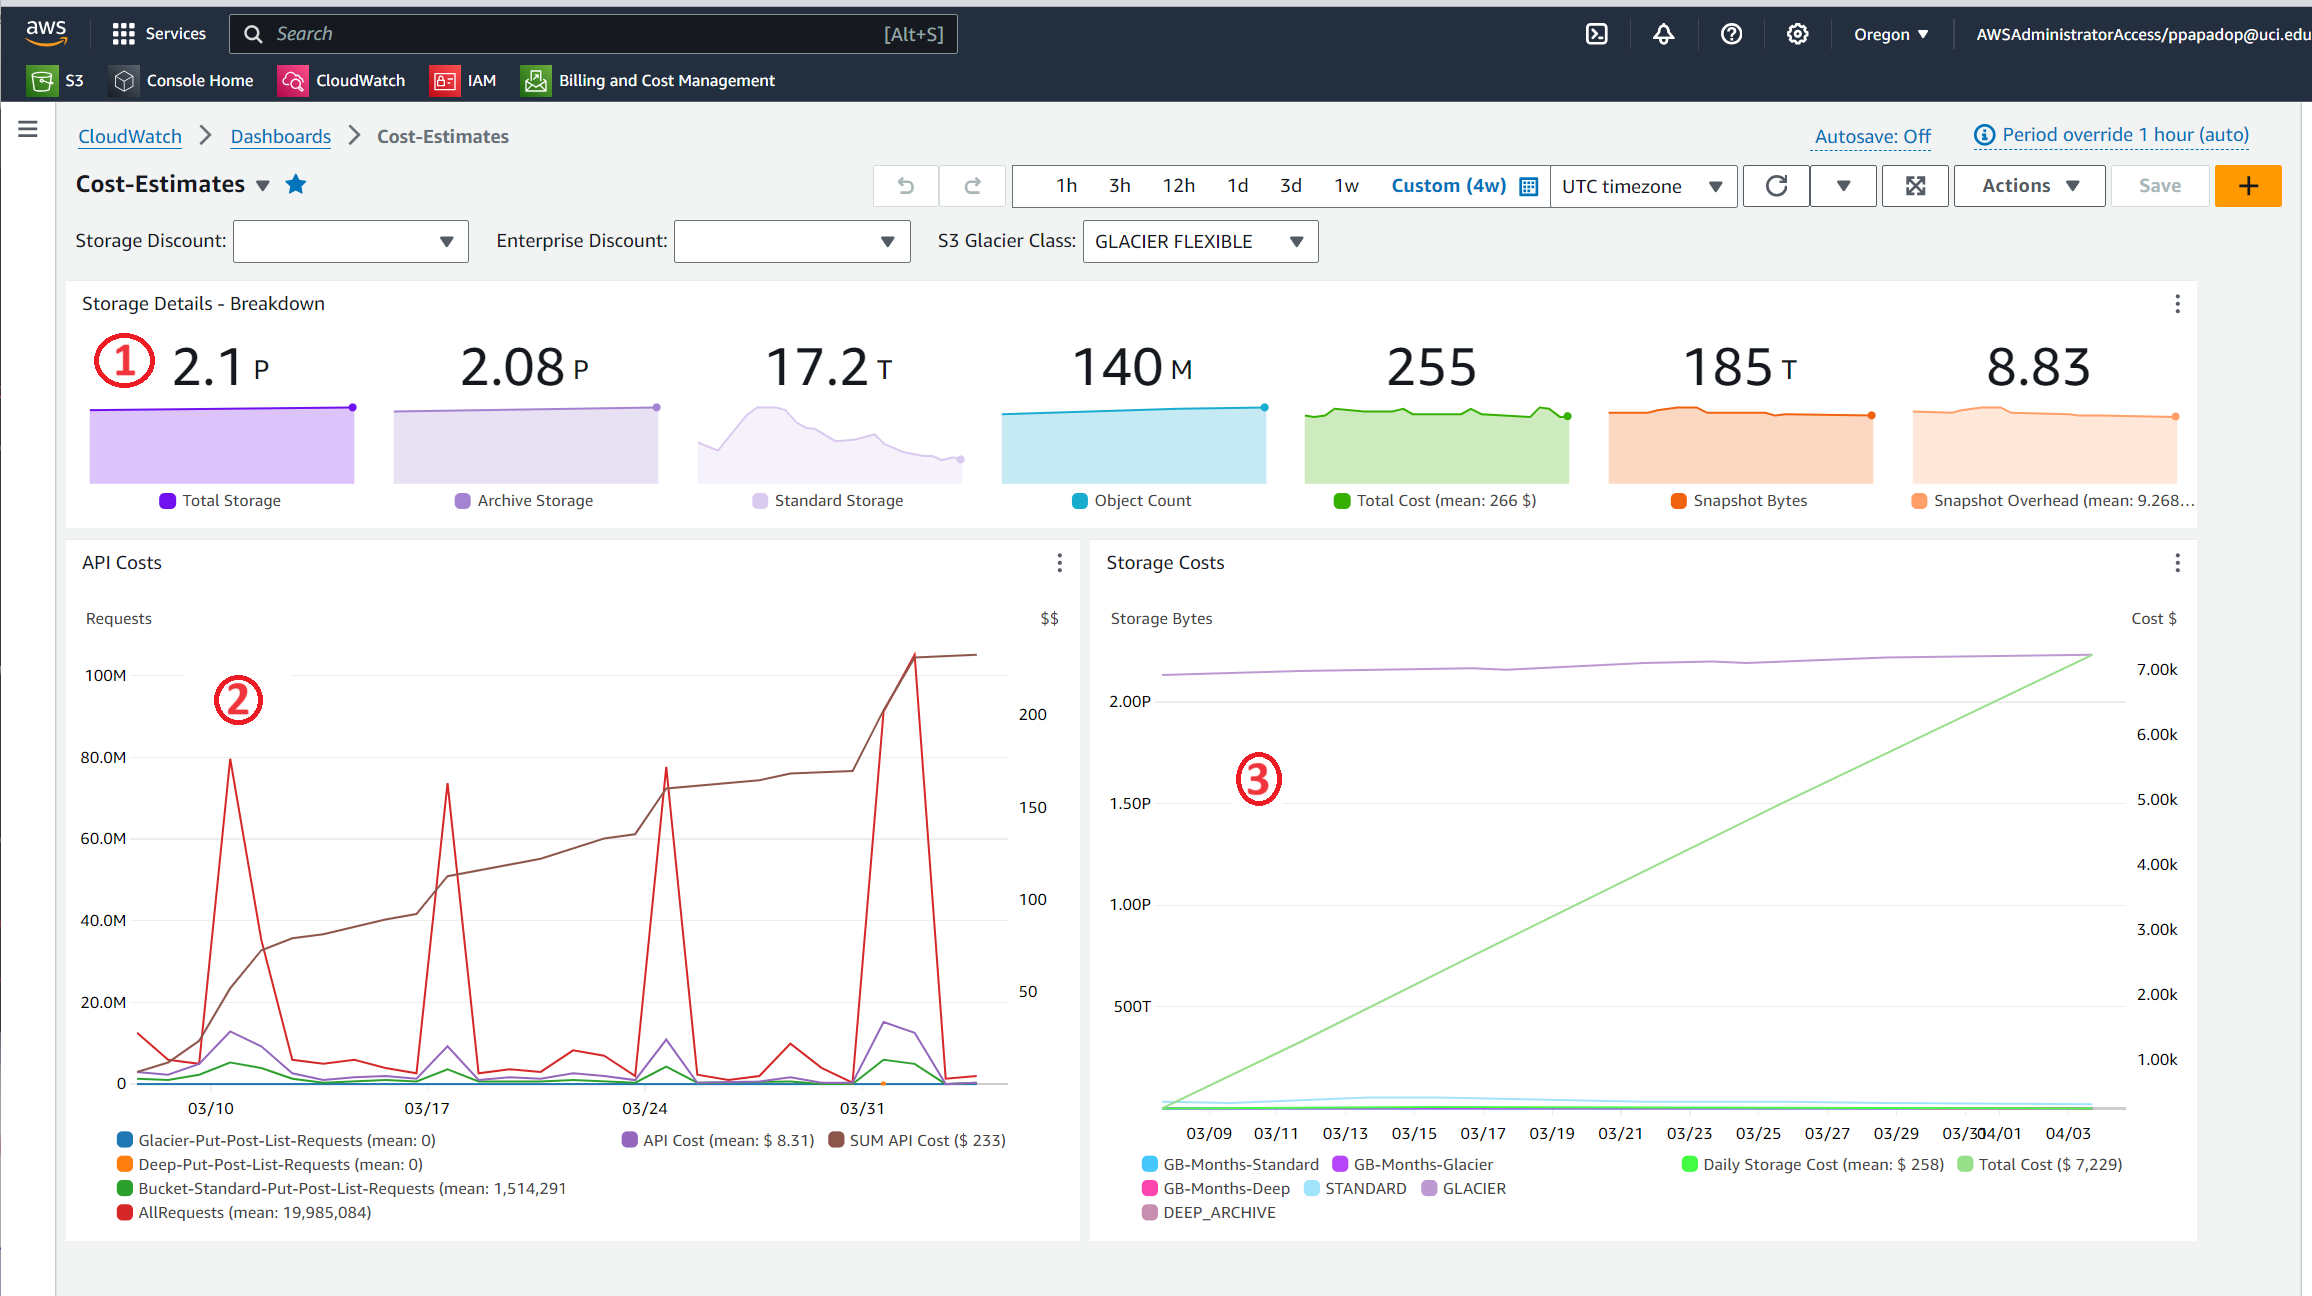
- 1:
The top 7 line graphs describe total data, data in archive, data in standard, number of objects (files), cost of storage and API calls over time, how much data is in “snapshots” (either deleted or overwritten data), and percentage overhead of snapshots.
- 2:
The line graphs on the left show API cost over time
- 3:
The line graphs on the right show storage costs over time.
Note
The time frame is settable (standard Cloudwatch), but we find that 4 weeks (default) and 3 month graphs are the most useful. Please note that the metrics used to create this dashboard utilize AWS-supplied measurements. Those measurements are updated daily, so this is not a real-time view.